Health & Wellness

My Peloton Cycling Hack...

Untitled_Artwork.jpg
IMG_0309.jpeg

Okay, so the number one & two questions I get on Instagram is : “How much do you love your Peloton bike?” And when I tell them I don’t own one, the next question is: “Then what bike do you have and do you recommend it?”

Lets go back to 2016, when I learned that I actually enjoyed spin classes by buying a cheap stand for my road bike (which I hated, because it was loud and awkward). I highly recommend learning whether or not you like spin classes before you make this investment, because this type of workout isn’t for everyone.

But I’m going to be real with you all, because you know that’s just how I roll. Listen up. If you have the money to invest in a legit Peloton bike & you already know you love spin classes, I will tell you, WITHOUT A DOUBT, invest in that bike. I’m just biding my time until I can afford to buy one of my very own, but this little hack in the meantime has helped me!

Flash forward to 2018, Ryan asked me what I wanted for my birthday, and after just coming off of a full year of breastfeeding Verona, I was ready to tone up, but didn’t want to go back to my makeshift bike stand. To his surprise, I said “Please get me a spin bike. Or a Peloton” In true Ryan fashion, he proceeded to get on Consumer Report, and read everything he could to figure out the most bang for our buck. We only had a couple hundred dollars to spend at the time, and so he bought me a Sunny Health Stationary bike. (They don’t make it anymore, But I have linked one similar).

My View. Notice the top left corner telling me my heart rate and cadence.

My View. Notice the top left corner telling me my heart rate and cadence.

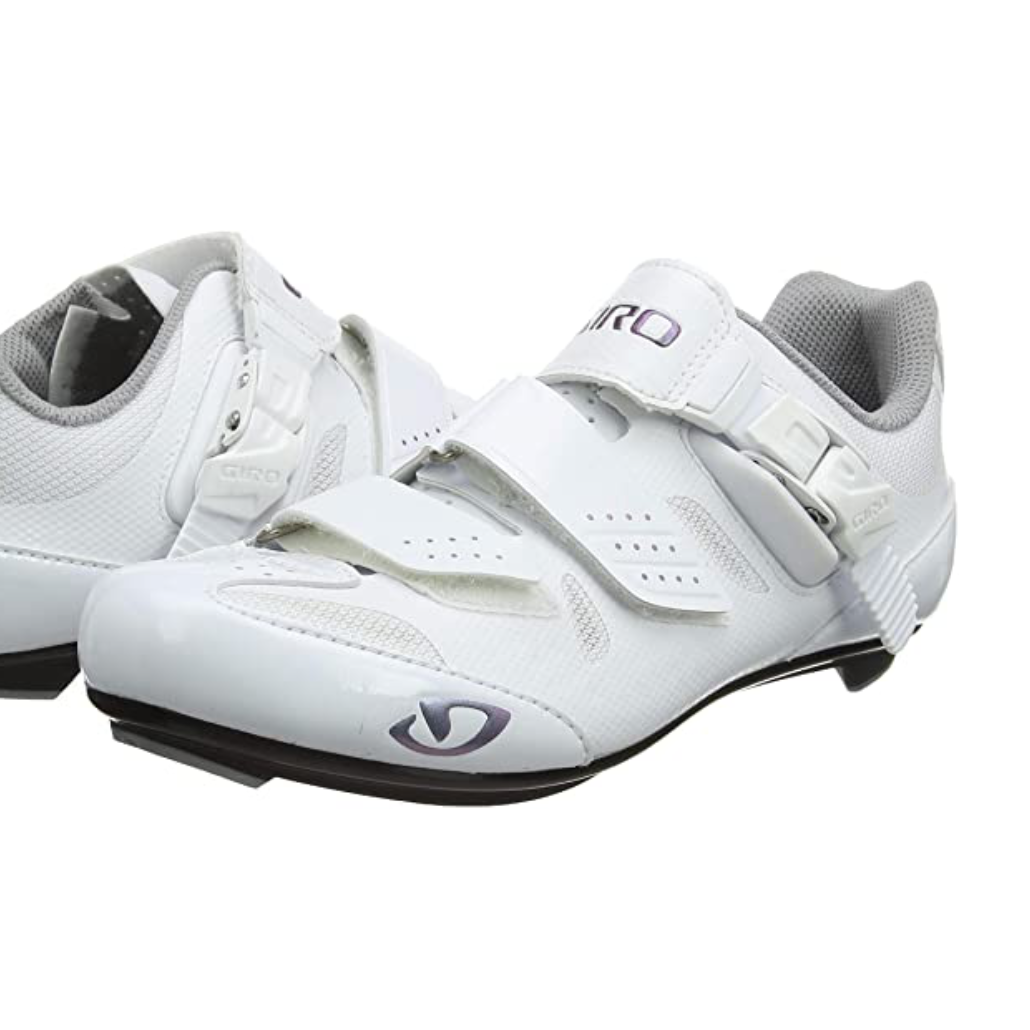
The key to success was the add ons: switching out the caged pedals with legit cycling pedals, getting riding shoes, a cadence sensor and heart rate monitor & downloading and paying for the Peloton app. {Which is free for 30 days right now, with a new signup btw}

When using the Peloton App on my iPad, I can connect my heart rate monitor and cadence sensor through bluetooth and it makes it so much easier to follow along with the workouts! I set my iPad on the handle bars, clip in and get to work.

Unfortunately, you won’t know your resistance or output, but a lot of times the instructors will describe how the “road” should be feeling. (ie. Flat road, cycling through mud, steep hill, etc)

I can’t say enough good things about the Peloton app. Not only do I adore the cycling classes, but they also have Treadmill workouts, Vinyasa Style Yoga, Strength classes, bootcamps, Cardio, Outdoor Running Audio, Meditation, stretching and more. I can easily find something to do each day, depending on what level of exertion I want to do.

I love cycling. Especially when the workouts are tough, and the music is loud and amazing. I’m one of those people who is easily motivated by music, but it has been KEY right now for me to tune out the world and do the hard work.

Go to this link : << My Workout Love List on Amazon >>if you want to find my favorite sports bras, preworkout, protein powder, yoga favorites and more. I’m going to do a post later about my health journey, because I think that’s very important as well.

All the images below have links to each item if your interested! And if you have any more questions, please leave me some comments and I’ll try to answer as I go!!

Teach-It Tuesday: 10 Min Hip/Low Back Stretches

With my past two pregnancies, around 20 weeks I started to experience TERRIBLE hip, pelvic and lower back pain. I couldn’t even walk a mile without almost being in tears. I would describe my problems to my doctor and they would just write it off as pain that is common with pregnancy. I would go to the grocery store and end up leaving early, because the pain was so unbearable that I could barely handle pushing the cart. Lots of crying. Lots of frustration, that only got worse the second time around having to chase after an active two year old. I started going to a chiropractor, which was a great temporary fix, but later that night, I was back to the same pain. Turns out I suffer from Symphysis Pubis Dysfunction or (SPD), and no one could give me any answers on how to make it better. 

IMG_0832.JPG

After giving birth to Verona, I still struggled with that back and hip pain, it was so bad that I wasn’t even able to pick up my right foot to get dressed, I could barely handle carrying Verona to and from the car, and walking up and down stairs became almost impossible. It was pretty scary to be 31 years old,  unable to sit on the floor with my kids or take my kids for walks and push them in the stroller. I felt weak. So I decided to take matters into my own hands, bought a stationary bike, started stretching, yoga and taking spin classes and I ended up feeling so strong and the SPD pain was completely gone. 

When I found out I was pregnant in November 2018, I made my husband promise to make sure I don’t give up on cycling and that I stay active. Now at almost 32 weeks, I feel great! Granted, I’m still pregnant and there is always a level of discomfort that comes with that, groans when getting out of bed, getting up off the couch, etc. But last weekend, we almost walked/hiked three miles and there was no complaining on my part. These stretches have helped me immensely, and when I start to feel a little sore, I stop what I’m doing and make sure I stretch to reset my body. I hope these are able to help you as well! 

All you need is a yoga mat, yoga block & have your socks and shoes off!  I’ve linked the ones I have. 

THE ROUTINE 

  • Start with a few rounds of Cat/Cow. (3-4x)

  • In a cross-legged seated position, right foot in front of left, walk your hands forward and keep your back long and straight. Hold for 10 sec. Walk hands to the right and then the left & then back to center, holding for 10 sec each way. Switch feet and repeat. (To modify, I sit in a butterfly pose and use a block on my feet to rest my head) Then I added a few side bends.

  • Lower your body to the mat, feet should be hip width apart, and bridge your back and bum up, then slowly articulate your spine back down to the mat. Concentrate on getting each vertebrae to touch the mat individually, upper back, middle back, lower back. (Repeat 3x)

  • Marching Flow- lift right leg to the sky, cross over left knee letting your leg relax and open up, then back to the sky and back down to the mat. Repeat the same with the left leg. 2x each leg.

  • Repeat again with your right leg, cross over left knee, but this time hold it and press down on your hips making more space in your spine and hips. Then thread the needle, by placing both hands around your left leg and pulling it into your chest, holding for 10 sec. Then slide both legs, and grab your ankles for “cow-face pose on your back” and hold for 10 sec. Place both feet on the mat, reset with a bridge and repeat with the left side.

  • Walk your feet to the edge of the mat, and bring your knees together so you are “pigeon kneed” then drop both legs to the right, then both legs to the left, almost like windshield wipers. Repeat this 4x total. Then both knees to the left and take your left foot and place it on top of your right knee. Repeat on Right side as well.

  • Using your block, place it at the base of your spine, lower back. Pull your right leg to your chest, then stretch your left leg long. Try to rotate your left knee inward to feel more stretch in your hip. Hold for 10 sec. Repeat with other leg.

  • Happy Baby: On your back, grab the inside of your feet and rock from side to side.

  • Come to a seated position, and repeat the second step, seeing how much more loose and open your lower back and hips feel.

Please let me know if this has helped you, or if you would be interested in more posts like this. We need to stay active! I refuse to go back to all that discomfort and back pain, when carving out 20-30 min a day to make yourself a priority is so easy! Happy Tuesday! <3