Finding Joy Right Where I'm Planted...

IMG_3087.JPG

We’ve all heard the quote “Bloom Where You’re Planted” And if this year has taught me anything, it’s simply that. If you talked to me four years ago, I could tell you a million things I wished we had… things that I wished we could change about our house, our life, our financial situation. I was busy looking left and right and eyeing up all the things I didn’t have, and the lives of others on instagram, wishing for a home that felt “instagram-worthy” and perfect. I’m not generally someone who covets what others have, but I could easily get consumed by petty jealousy and play a mean game of comparison.

IMG_3048.JPG

In the last few years, I’ve worked pretty hard on this. I’ve become best friends with the “unfollow” button, or the mute button. I’ve stopped picking up magazines, stopped looking for things I want, and focused so much more on what we need, and let everything else fall away. Social media is very good at feeding us a lie that tells us that what we have is never enough and what other people share about having is what we also need to have. Living a life of excess, having an over abundance of stuff, a new wardrobe every season, blah blah blah… but I realized it’s not what is going to bring you happiness. Maybe it will in the moment, but long term, you can’t sustain that. Instead, you need to find the joy right where you are. In your current moment. Look around and pick out a couple things that make you smile. Count the blessings.

ACS_0188.JPG

My life is far from perfect. My home… far from perfect. Are those homes I see all over Instagram beautiful? You betcha. Would it be nice to have a little more space for our family to spread out a little? You betcha. But I am so proud of the home we do have. I love that we own a home that when people walk in, they feel cozy and welcomed. 2020 was the year we all stayed home, and the fact that I can say, I still love everything about this house, flaws and all, is saying something.

IMG_2344.JPG

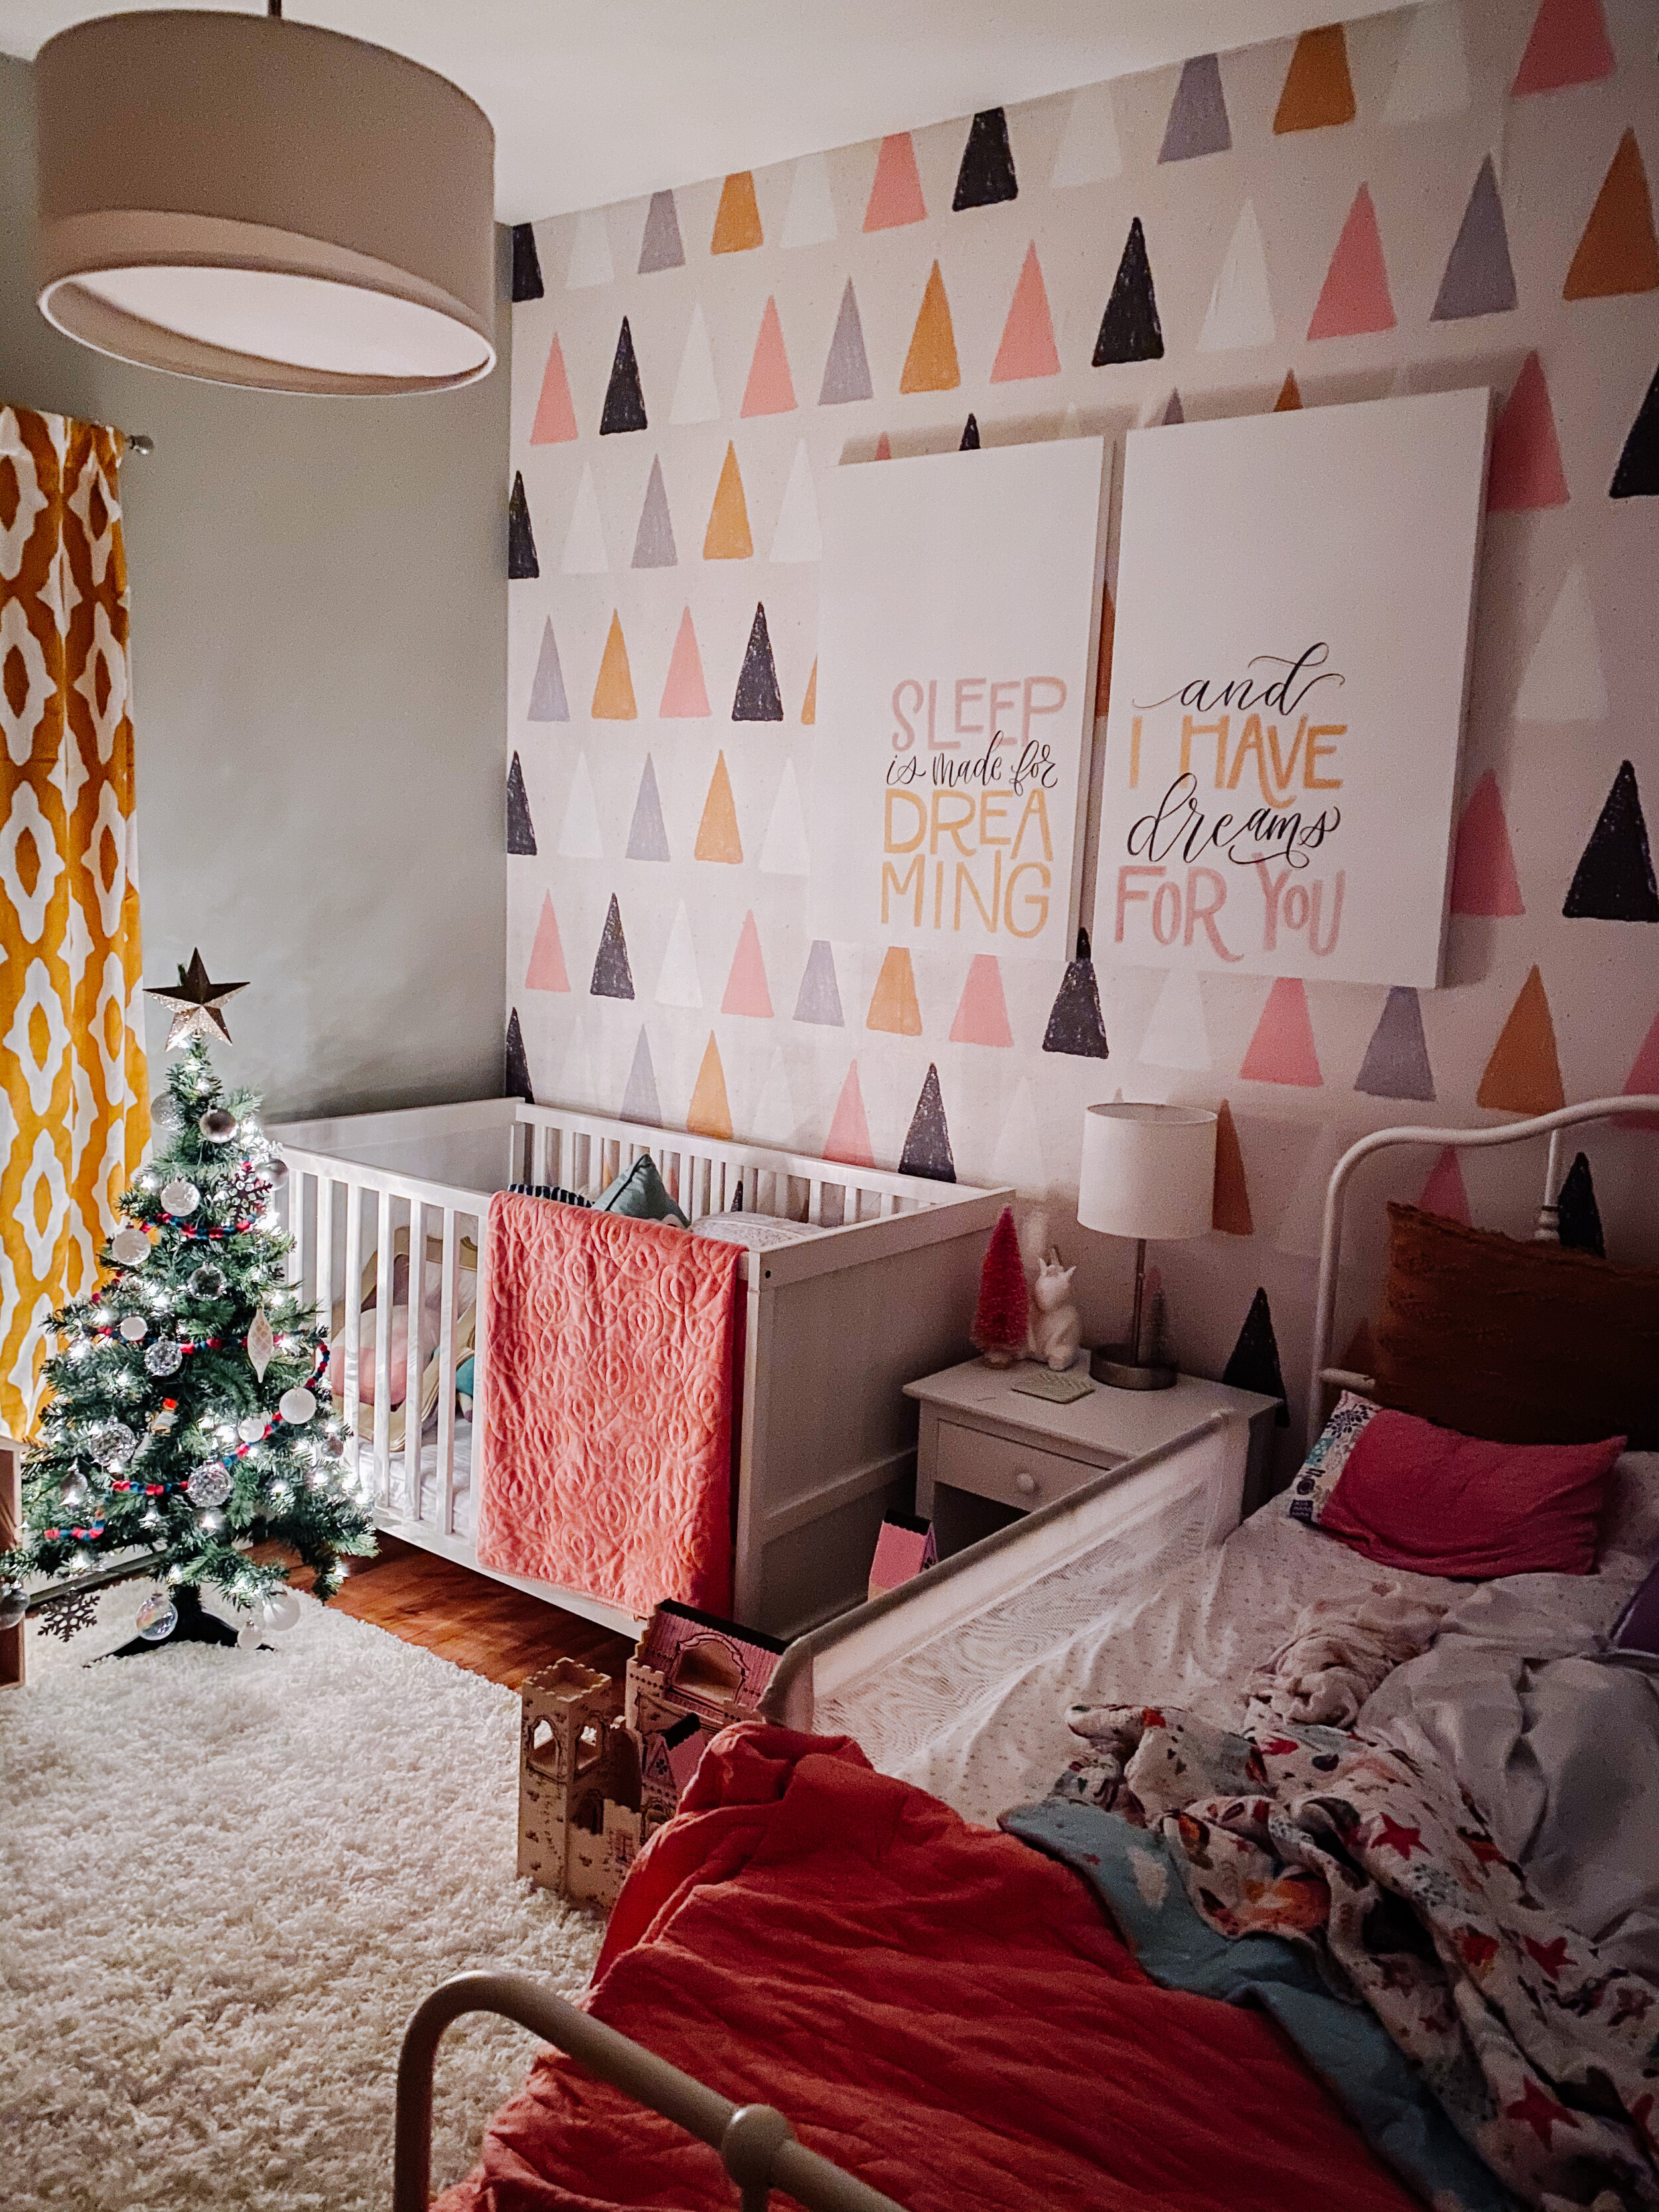
I wrote an instagram post this morning about instead of comparing my life to what others have, I talked about the joy I felt when I made my bed and saw the new Christmas quilt and red pillows. Seeing so cute and put together, I remembered that wish i made three years ago that “one of these years I’m going to bring the Christmas decor to our bedrooms, in order to bring the holiday magic to the whole house.”

Last year, I invested in two very small and inexpensive trees for the kids rooms. Slowly, but surely, I’m creating the dream I had for us with the limited budget we have, but creating something magical for my children has become more of a priority for me than getting likes or follows on instagram.

Yesterday, as Jonathan looked around the house, he told me… “Mama, Christmas is my favorite time. This looks so magical.” I could feel the lump in my throat, and it made me realize that THAT is what it’s all about. Creating magic in the every day. And for me, there is nothing more magical than a home at Christmastime.

IMG_3069.JPG

A Room Remodel: Wallpaper Makes all the Difference.

2020-11-06_0001.jpg

Four score and six years ago… we created a fun and creative space for our new little baby boy. Three years later, we added a baby girl, but because Ryan had just graduated with his Masters, we didn’t have the money to give her a whole new room. So… We took down the small shelves, changed the curtains, added a cute rug and called it good for the time being. There was no rhyme or reason to any of the decor choices, but I really loved those yellow curtains and knew that would be my starting point when I figured out a design for this room one day.

C95E5B47-0E5C-4A5D-AD2E-34E9AA7F93A8.JPG

Using the curtains as my color inspiration, I found a wallpaper company I loved and after looking through pages and pages of designs, I narrowed it down to a couple favorites. But for obvious reasons, those triangles just called to me. (I have a triangle tattoo on my arm).

I posted an instagram story saying I wish I could do a collaboration with them, and someone actually messaged me back telling me to send them an email! I could NOT believe it! And from there we sent emails back and forth and locked in on a design.

9A35079B-E4B1-46ED-BA94-FE678D2B5CC3.JPG

I found other inspiration in the Crate & Kids catalog, but knew the only thing I could afford was the adorable clothes hamper. But then we got to work.

When we removed the shelves & the trim on the chalkboard, the dry wall was damaged so we knew we had a lot of work ahead of us before we could start installing the wallpaper.

We received the wallpaper the week before all the stay at home orders went into affect. Ryan was super sick that week (negative for covid-19) and then that sickness spread like wildfire through our house. So not only were we dealing with Ryan working from home, no school and not being able to really leave our house… we also had so many projects in our house hanging over us. We finally started our girls room project at the beginning of April.

We had to patch the holes, as well as skim coat the stripes on the old wall to make sure that you couldn’t see the texture from the paint. This was a tedious process, because my sweet husband is a perfectionist and we kept having weird issues with the plaster not adhering to the wall and fine bubbles. Not to mention, something we would normally get someone to watch the kids so we could focus on the project without interruptions, we didn’t want to risk exposure, so everything we did was either during nap time, in between work days and weekends.

2020-11-06_0003.jpg

Finally by June, we were ready to hang the wallpaper! And I could not be MORE excited about this. One word of advice: Make sure the entire wall is fully painted white before installation. Regardless of the color on the wallpaper, it isn’t 100% opaque, and that dark shadow from the previous paint color at the ceiling is faintly visible through the paper.

2020-11-06_0004.jpg

On the ColoRay Decor website, our pattern shows the triangles with the points going down (like bunting), but I really loved the idea of them going the opposite direction, so at the last second we decided to flip it.

2020-11-06_0005.jpg
2020-11-06_0006.jpg

This is ABSOLUTELY a two person job. Go slow. Don’t rush. We started by giving a little extra at the top. Peeled back the backing and slowly worked from the inside of the sheet to the edges, squishing out all the air bubbles and making sure we didn’t have any creases. Ryan was on the ladder, and I was behind the wallpaper on the floor, slowly pulling the backing down evenly.

Did I mention, GO SSSLLOOOWWWWW. Match up the seams. And if you need to pull it off and reposition it, you absolutely can!!

When we were all done, using a straight edge and a very sharp Xacto-knife, we trimmed off the excess on the top & bottom and the sides.

2020-11-06_0007.jpg

We had been planning the room remodel for a couple years, and knew we would need to transition Verona into a big girl bed (Which we had already purchased from Ikea December 2019). I managed to take a chance on a bed spread that I ordered as a Target Drive up, praying it would be the right color, and asked for a new white rug for the girls room for Christmas 2019 in preparation for this upcoming remodel.

2020-11-06_0008.jpg

All the pieces were falling into place, and I had also dreamed of creating two big canvases as art for the wall to complement the wallpaper. I scored these 24x36 canvases from Michaels for 50% off, and was able to create something custom using my Tombow Dual Brush pens! (After planning it out on a smaller canvas just to make sure I liked the way it looked first). I love these lyrics from JJ Heller, and knew they would be perfect for my little girls room.

2020-11-06_0009.jpg

Our house is small. Our resources are limited. And money was definitely something we DIDN’T have to throw at this. But I knew creating a fun space for my little girls to grow up in was what was important to me, and here we are!

2020-11-06_0010.jpg

It turned out better than I could have ever dreamed, and I’m so grateful for the opportunity to work with ColoRay Decor on this bedroom. Every time I walk in this room it fills me with so much joy, and these two little ladies LOVE it!

2020-11-06_0013.jpg
2020-11-06_0014.jpg

List of links:

Wallpaper -ColoRay Designs

Bedframe -Ikea

Twin Quilt -Target

Shag Rug -Rugs.com

Clothes Hamper- Crate & Kids

Curtains -Target

Floral prints -Lulu Ink Designs

Other Print -Handwritten Hope

Almond Joy Coconut Ice Cream Recipe [Dairy Free]

ICE CREAM .png

I made a promise to myself that if I ever blogged recipes, I wouldn’t go into so much detail that it required discussing how my first born child was conceived… because if i’m being honest… I never read what they write on those food blogs anyway. Just show me the dang recipe.

Let me just say. I love ice cream. LOVE LOVE LOVE… but it does NOT love me. So when I was given an ice cream maker for my birthday from my sister, I was pretty pumped to try some dairy free options that weren’t full of all those additives that only bloat my stomach.

I don’t miss anything when I eat this ice cream. It’s completely perfect and I can’t wait to make this again soon. I will link my ice cream maker, just click on the photo <—. Enjoy!

Almond Joy Coconut Cream Ice Cream

Print
Almond Joy Coconut Cream Ice Cream
Author: Jordanne Marie
(Dairy Free)

Ingredients

  • 2 Cans of Coconut Milk (chilled in the fridge a couple days)
  • 1 can of Coconut Cream (chilled in the fridge a couple days)
  • 1 cup of Sugar
  • 1 1/2 Tablespoons of Vanilla Extract or Vanilla Paste
Mix in
  • 1/2 cup sweetened coconut
  • 1/3 cup almonds roughly chopped
  • 1/3 cup finely chopped dark chocolate bar

Instructions

  1. In a medium mixing bowl, use a hand mixer or stand mixer on low speed. Combine the coconut milk and sugar until the sugar is dissolved-about 5 minutes.
  2. Stir in the coconut cream, shredded coconut, chocolate bits, almonds and vanilla.
  3. Turn the machine on. As its running, slowly pour coconut mixture into ice cream maker. Depending on the size of your machine, this might have to work in two batches. 
  4. Let mix until thickened, about 20 to 25 minutes.
  5. transfer to a loaf pan or in a freezer friendly container, cover with foil and freeze for 2 hours before serving. (I saved chobani containers and they worked amazingly)

Notes:


Did you make this recipe?
Tag @Jordanne__marie on instagram and hashtag it #jordannemarielovessharing
Created using The Recipes Generator

My Holiday Tradition [Thirty-something Years in the Making]

IMG_2285.JPG

It was 2014, I was trying to figure out my first Christmas as a new momma and felt this overwhelming pull to do something creative. (I swear, that’s the story of my life as an artist… always looking to do something creative). I had just bought two 6 packs of navy & white glass bulb ornaments and had some left over paint pens from a previous project. I can make an ornament for Jonathan, like my mom used to do for us.

IMG_1492.JPG

A little background on the ornament making tradition in our family. It goes back to the late 80’s, when my mom had the same desire to make something creative for her kids, and so the yearly ornament was born. She would create a new design every year and make one for her kids and all of her nieces and nephews. (And my family is a big Irish Catholic family, so there is A LOT of us) <3 Somewhere around 2007-08 my mom decided to call it quits on the ornaments as her kids started to grow up and finish high school.

It only felt natural with my love of Christmas, to carry this tradition on, but the really fun element for me, was it was a way to spread this joy and love all over the country. If the only good thing about social media and the internet was that it helped to connect people who wouldn’t have normally met in other circumstances to somehow find people they enjoy or have things in common with, I’d say its been worth it.

IMG_2430.JPG

It started off slow… maybe 15 orders my first year, 25 my second year… but then I started added designs and options. And the orders starting coming in… ways for people to remember their loved ones, milestones, thank clients, celebrate family parties & special moments. I am always so honored whenever an order comes through and I see what new special ornament I get to make for someone, or how I get to create something that can bring joy or peace to their heart when they hang it on their tree.

IMG_6232.JPG

My second year, we had been feeling a hole in our hearts for the baby we had lost earlier that year, and making an ornament to remember him always fills my heart when I see it and know he is with us and watching out for his siblings from heaven. That year, I asked people to submit friends or family members who have experienced loss of a pregnancy or infant to send me their address so I could bless them with an ornament. Praying over those ornaments that they would give those families peace like I felt remembering my sweet baby.

59674744178__3F3FD355-8EB7-47E3-8111-58B16D301975.JPG

This is my seventh Holiday season making ornaments for people, and the joy of doing this has only grown. I love getting to come up with new ideas and designs. I mean this from the bottom of my heart, so much love goes into every design, so much prayer goes into every launch hoping these new designs bring a smile to someones face. Christmas can be hard for so many, so I pray I can bring simple joy to those who need it most.

If you have ordered in the past, Thank you… If you plan to order this year… Thank you. You have helped me find an identity outside of being a mom, that allows me to help provide a modest Christmas for my family, especially these past few years as we struggle towards financial stability.

IMG_9727.JPG

2020 has been hard for so many reasons, but let’s make a plan to make these last 60 days of the year so joyful and full of cheer!

I’d love to make something for your Christmas tree this year! I find so much joy in making every detail special! <3

a portion of orders from 2015

a portion of orders from 2015

a small portion of orders from 2019

a small portion of orders from 2019


Some of my Ornaments this year… more in the shop!

White Porcelain Ornaments *Pre-Order
$14.00

This is a Pre-Order, with everything shipping out on November 24th!